Hip MSK
Musculoskeletal Dynamics
Structures
- Bones
- Acetabular labrum
- Capsuloligamentous
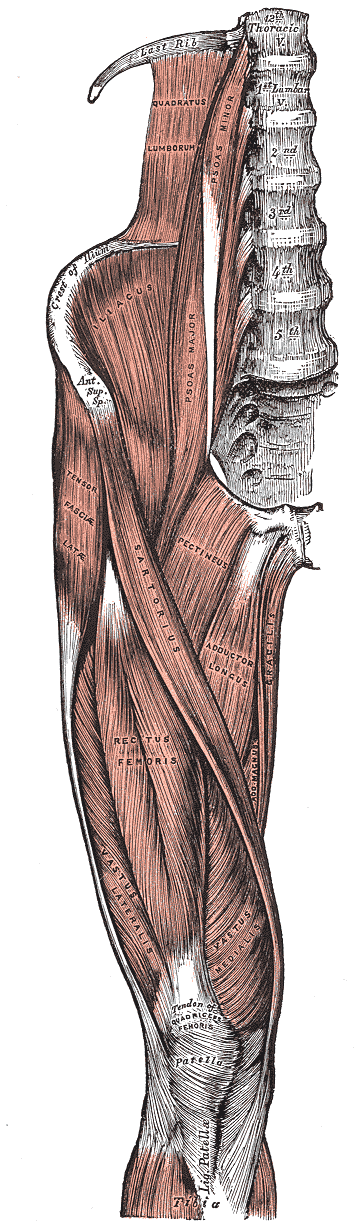
- Musculotendinous anatomy
Bursae
Bursae are fluid-filled sacs between bones and soft tissues5. Often, bursa separate tendons from underlying bone5. Bursa function to reduce friction to protect tissues that undergo much repetitive movement5.
There are 3 key bursa of the hip according to the APTA5- Greater trochanter bursa
- Iliopsoas bursa
- Ischial Bursa
Traditionally, bursa dysfunction is thought to be a cause of hip pain5.
Dutton focuses on 3 greater trochanteric bursae:
Joint Capsule and Ligaments
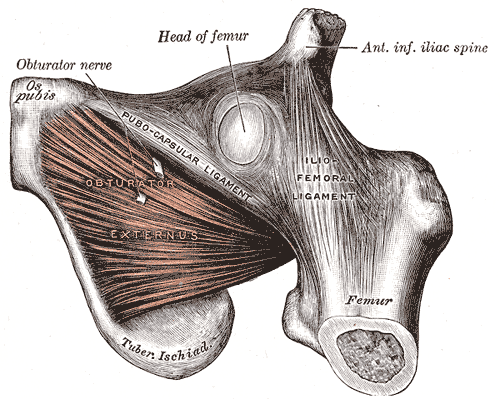
- Iliofemoral ligament
- Pubofemoral ligament
- Ischiofemoral ligament
- Ligamentum Teres
- Transverse acetabular ligament
Acetabular Labrum
The acetabular labrum is considered similar to the glenohumeral labrum and the knee menisci since all are fibrocartilage structures which function to enhance joint stability and increase joint contact2
Sensory functions
The outer third of the labrum has nerve-endings to detect nociception and sensory end organs for proprioception2
Functions
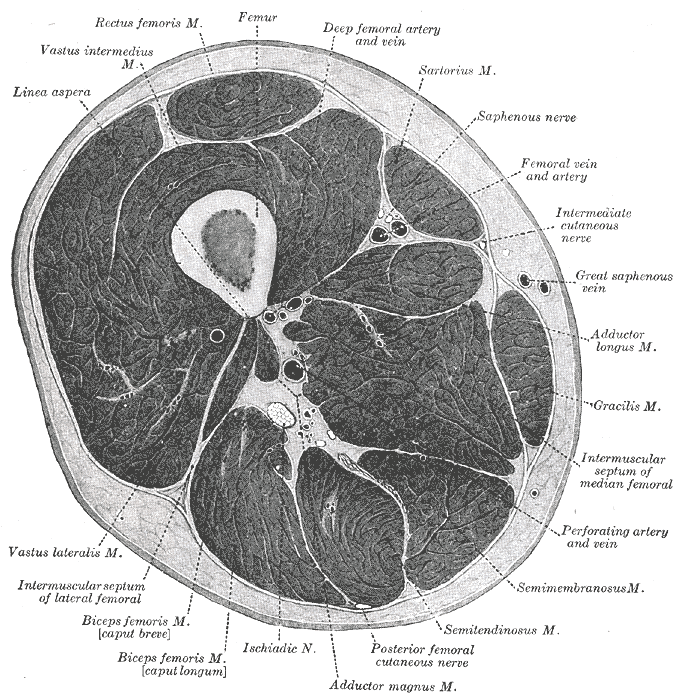
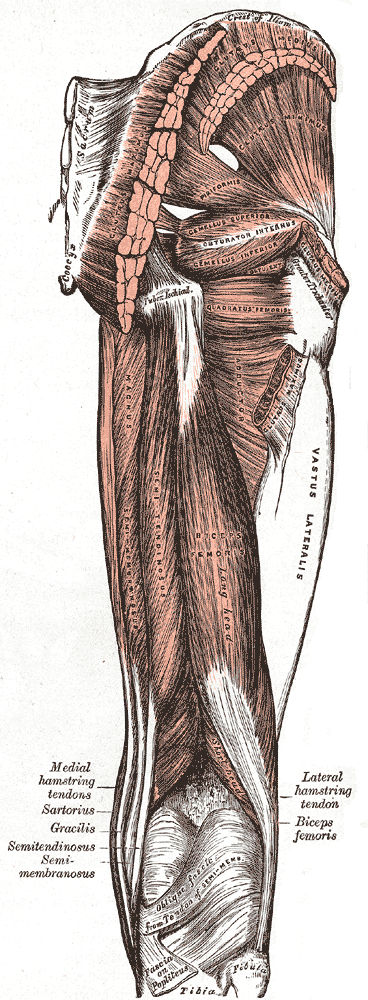
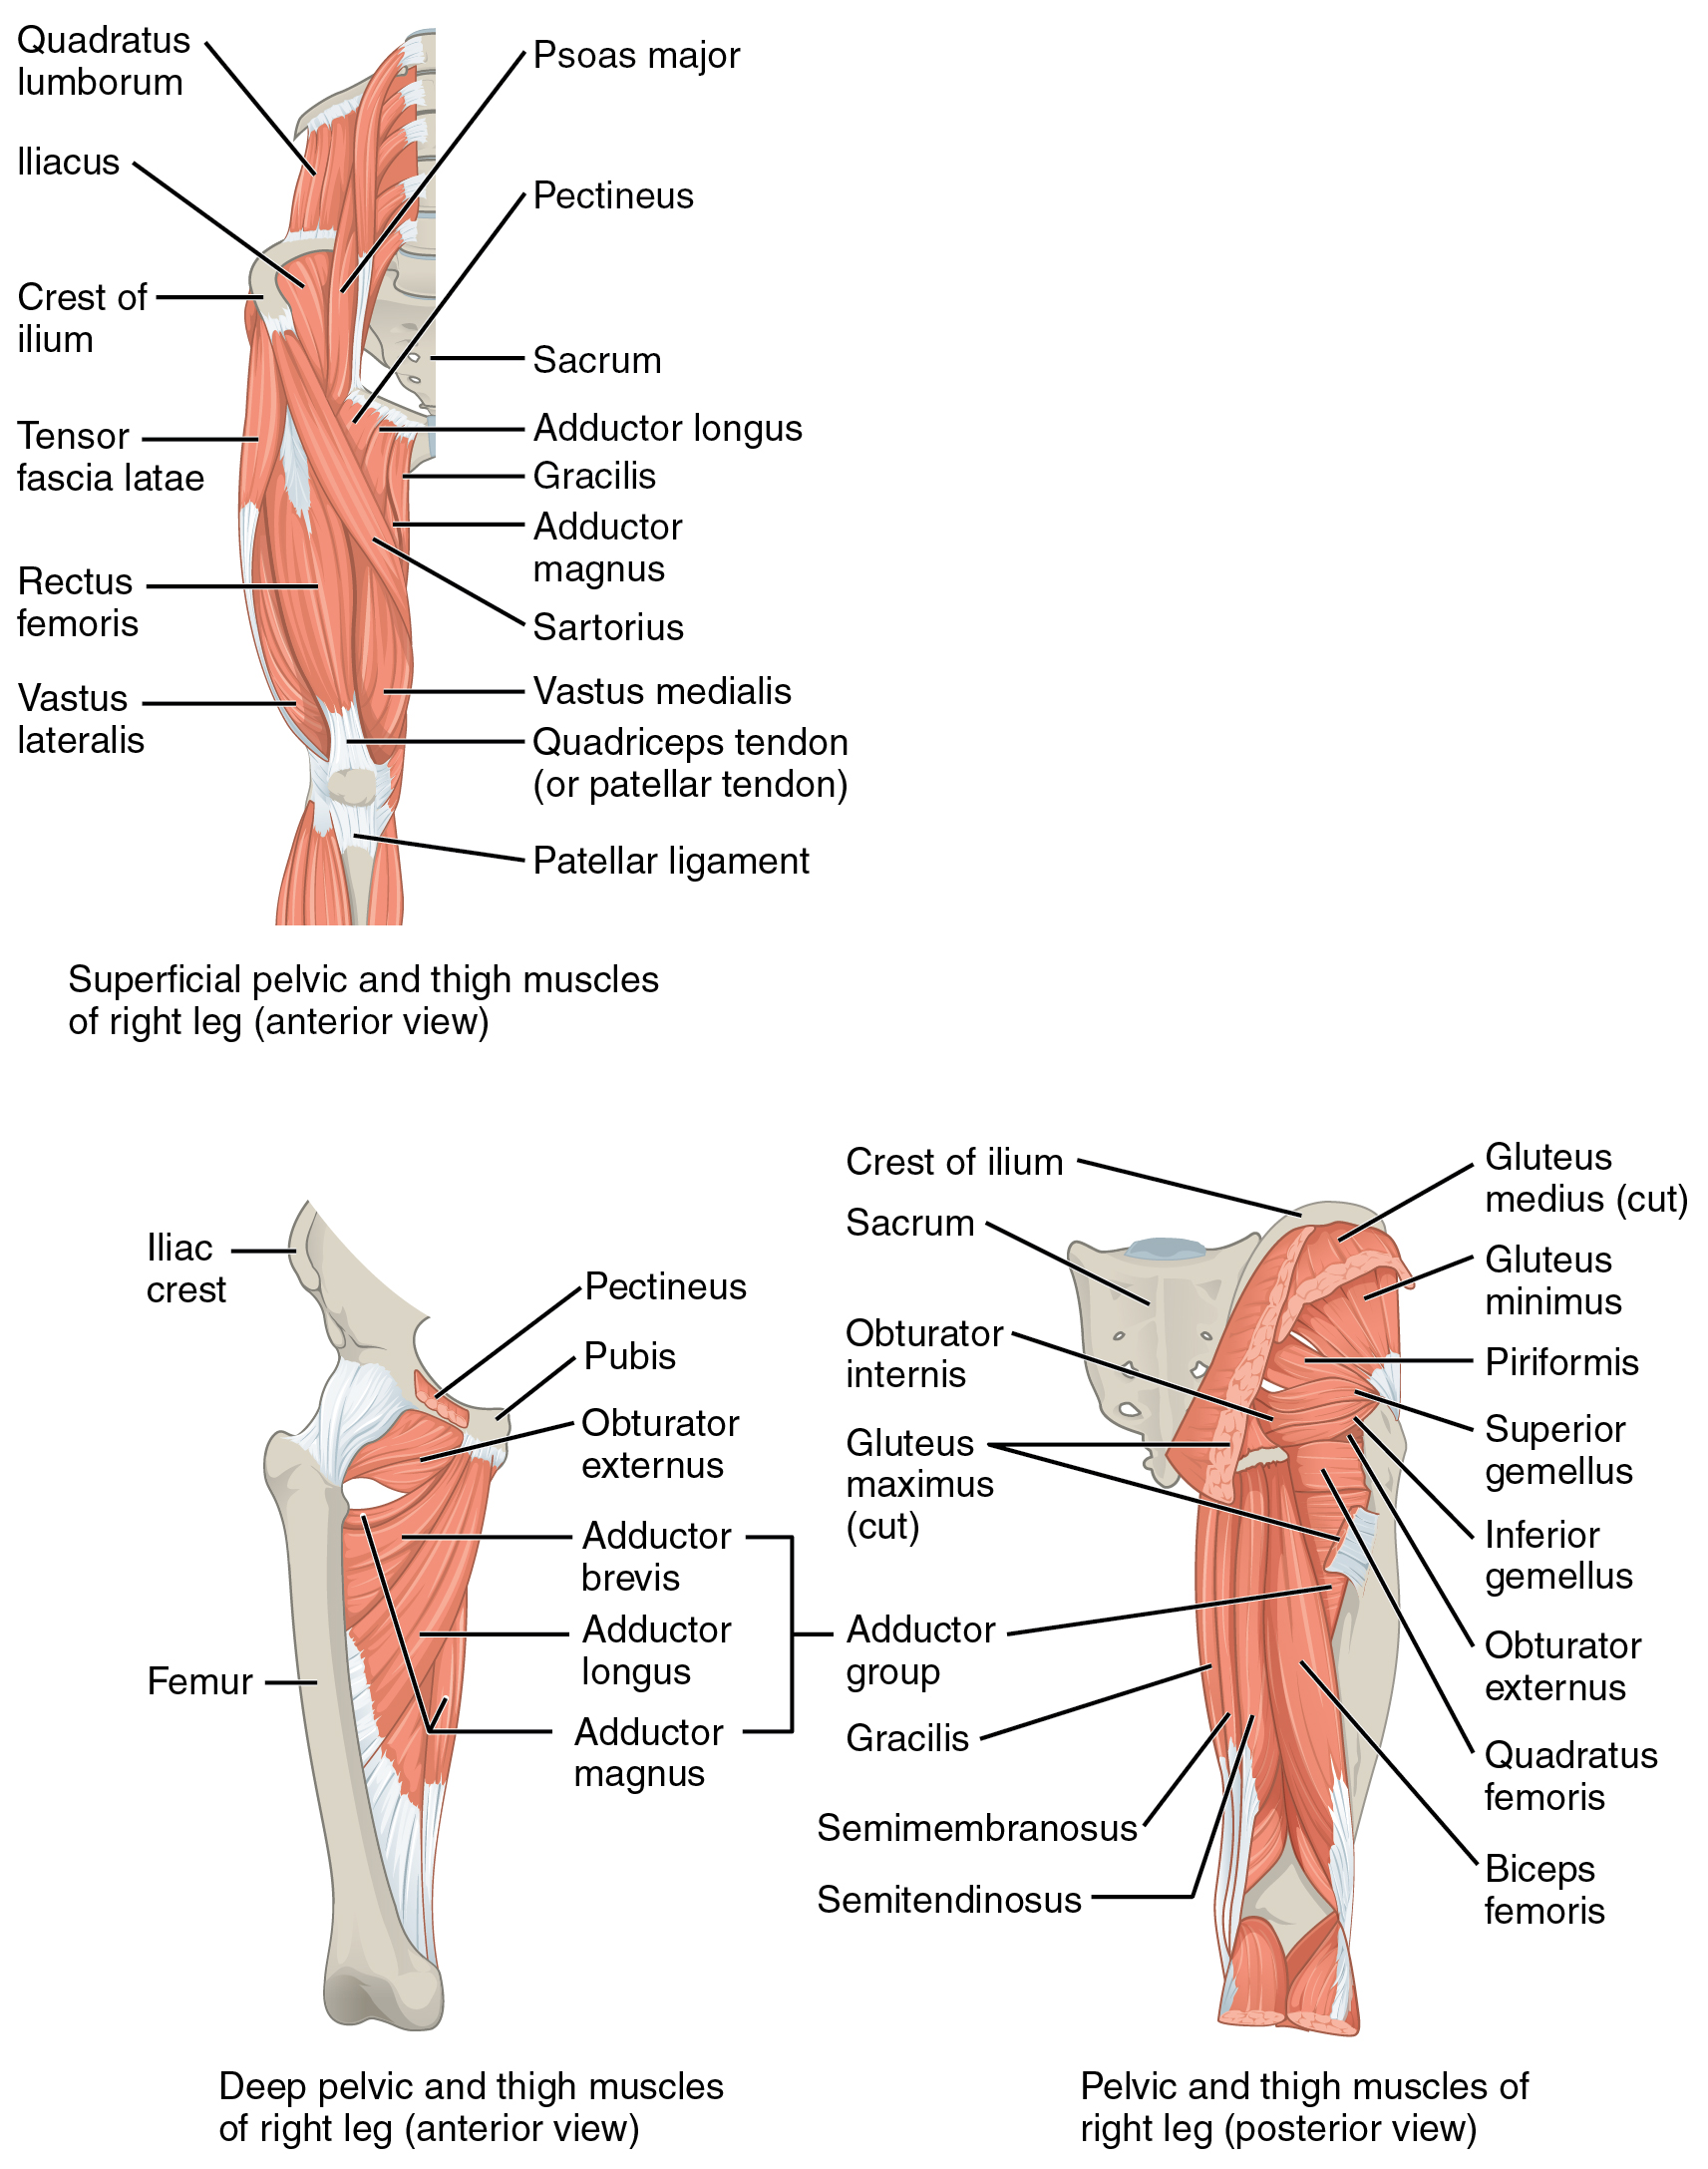
Muscles
Osteology
Innominate
Femur
Acetabulum
Alignment
Acetabular alignment
Acetabular Labrum
Hip joint Capsule
Pack Position
Ligaments
Arthrokinematics
Lumbopelvic Movement
pelvic pronation
lumbopelvic hip complex during ground impact is a combination of 3-D shock-absorbing movements driving the pelvis into an anterior tilt, forward rotation, contralateral drop, and concomitant spinal extension/rotation and relative sacral nutation. Triplanar pelvic motion is analogous to pronation at the foot—an important mechanism for absorbing ground reaction forces6 and a key antecedent for effective propulsion during gaitdischiaviRethinkingDynamicKnee2019?
Biomechanics
Coxa Vara & Coxa Valga
“As previously described in this chapter, the average angle of inclination of the femoral neck is approximately 125 degrees (see Fig. 12.7A). The angle may be changed as a result of a surgical repair of a fractured hip or the specific design of a prosthetic hip. In addition, a surgical operation known as a coxa vara (or valga) osteotomy intentionally alters a preexisting angle of inclina tion. This operation involves cutting a wedge of bone from the proximal femur, thereby changing the orientation of the femoral head to the acetabulum. A goal of this operation is often to improve the congruency of the weightbearing surfaces of the hip.e”6
Joint Positions
Pack Positions
There is an Open-pack and Closed-pack position for each joint5. The Open-pack Position refers to when the hip has minimal capsuloligamentous tension and joint congruency5.
Open-pack
The Open-pack position for the hip joint occurs at 30° of flexion, 30° of abduction, and slight external rotation in most people5.
which allows maximal accessory joint motion.
Kinematics
Flexion
Osteokinematics
- Active flexion < Passive flexion
- 120 ° flexion (when the knee is flexed)7
- 90 ° active flexion knee extendedkapandjiPhysiologyJointsVol2007?
- 120+ ° active flexion knee flexedkapandjiPhysiologyJointsVol2007?
Arthrokinematics
- Posterior/inferior glide/spin (According to class)
Limits
- inferior joint capsule and ischiofemoral ligament (inf fibers), gluteus maximus, soft tissue – thigh to trunk
- When the knee is extended we have passive insufficiency of the hip flexors -> now only have 80-90 degrees of hip flexion
- passive insufficiency from hamstrings, gracilis
Extension
Osteokinematics
- 10-20 °
- “0 ° of hip extension when knee flexed”
Arthrokinematics
- Anterior slide & spin (According to class)
Limits
- anterior joint capsule, capsular ligaments (iliofemoral, ischiofemoral (if IR), pubofemoral)
- Rectus femoris will limit hip flexion more if the knee is extended since the RF crosses both the hip and knee
- Iliofemoral ligament is stressed during hip extension -> will limit hip extension
- Ischifemoral ligament comes from posterior side of capsule and wraps around to the front -> hip extension would pull the fibers down and cause stress -> limits hip extension when the hip is IR
Abduction
Osteokinematics
- 40°
Arthrokinematics
- Superior roll
- inf/med slide
Limits
- adductor muscles and the pubofemoral ligament
Adduction
Osteokinematics
- 25 °
Arthrokinematics
- Inf roll
- Sup/lat slide
Limits
External Rotation
Osteokinematics
Arthrokinematics
- Post roll
- Ant slide
Limits
- Medial rotators
- Pubofemoral ligament
- Lateral iliofemoral ligament
Internal Rotation
Osteokinematics
Arthrokinematics
Limits
- Posterior capsule
- Ischiofemoral ligament
- Lateral rotators
- Iliofemoral ligament
Motions
There are 6 motions of the hip joint.
Flexion & extension which occur in the sagittal plane. Abduction & Adduction which occur in the frontal plane. Internal and external rotation in the transverse plane.
Pathologies
Fractures
Avascular Necrosis
Systemic Inflammation
Infection
Femoral Neck Stress Fracture
Ankylosing Spondylitis
Lumbar disc herniation
Lumbar Radiculopathy
SIJ Dysfunction
Pelvic floor dysfunction
Hip Osteoarthritis
Hip Microinstability
Femoroacetabular Impingement Syndrome
Hip Dysplasia
Greater Trochanteric Pain Syndrome
Piriformis Syndrome
Iliopsoas Complex Injuries
Adductor muscle strain
Hamstring muscle strain
Hip Infection
Examples include septic arthritis or osteomyelitis
Gout
Avascular Necrosis (AVN)
- Onset: >6 weeks
- ~30-50 years old
- Traumatic MOI
- Atraumatic MOI: Hx corticosteroid use
- Decreased ROM
- Pain with weightbearing
Presents like OA but with a short onset
Warrants medical referral
Stress Fractures
Overuse injuries resulting in bony degeneration
Presentation
- Population 1: Athlete undergoing high repetitive loads
- Population 2: Osteoporosis with weakened bone structure
- Gradual onset of anterior hip pain
- Worse with activity, fully relieved with rest
- Single Leg Balance
- Single Leg Squat
- Single Leg Hopping
Stress Fx Diagnosis
Palpation is unreliable diagnostic tool due to the overlying soft tissue.
MRI is considered the gold standard for diagnosis of stress fractures.
Do not rely on XRAY results alone to rule out stress fractures.
Patellar Pubic Percussion Test
- Patient positioned in supine
- Stethoscope placed over pubic tubercle
- Tap ipsilateral patella
(+) Lack of sound propagation indicate femoral neck or pubic rami fracture
Red Flag Summary
- Lack of radiology
- Acute onset
- Trauma or a missing MOI
- Fever
- Erythema (redness)
- Edema (swelling)
- (+) Patellar Pubic Percussion Test
Lumbopelvic pathologies
Lumbar
Lumbar radiculopathies that result in radiating pain through and around the hip
SIJ
- Fortin’s Point: Pain around the PSIS
- SIJ Compression Test
- SIJ Distraction Test
- Innominate rotation
- SIJ Thigh Thrust Test
- Sacral Thrust Test
Pelvic Floor Dysfunction
- Bowel and Bladder Changes
- Hx of Pregnancy or Birth
- Pain with sexual activity
- Pain in Pelvic region
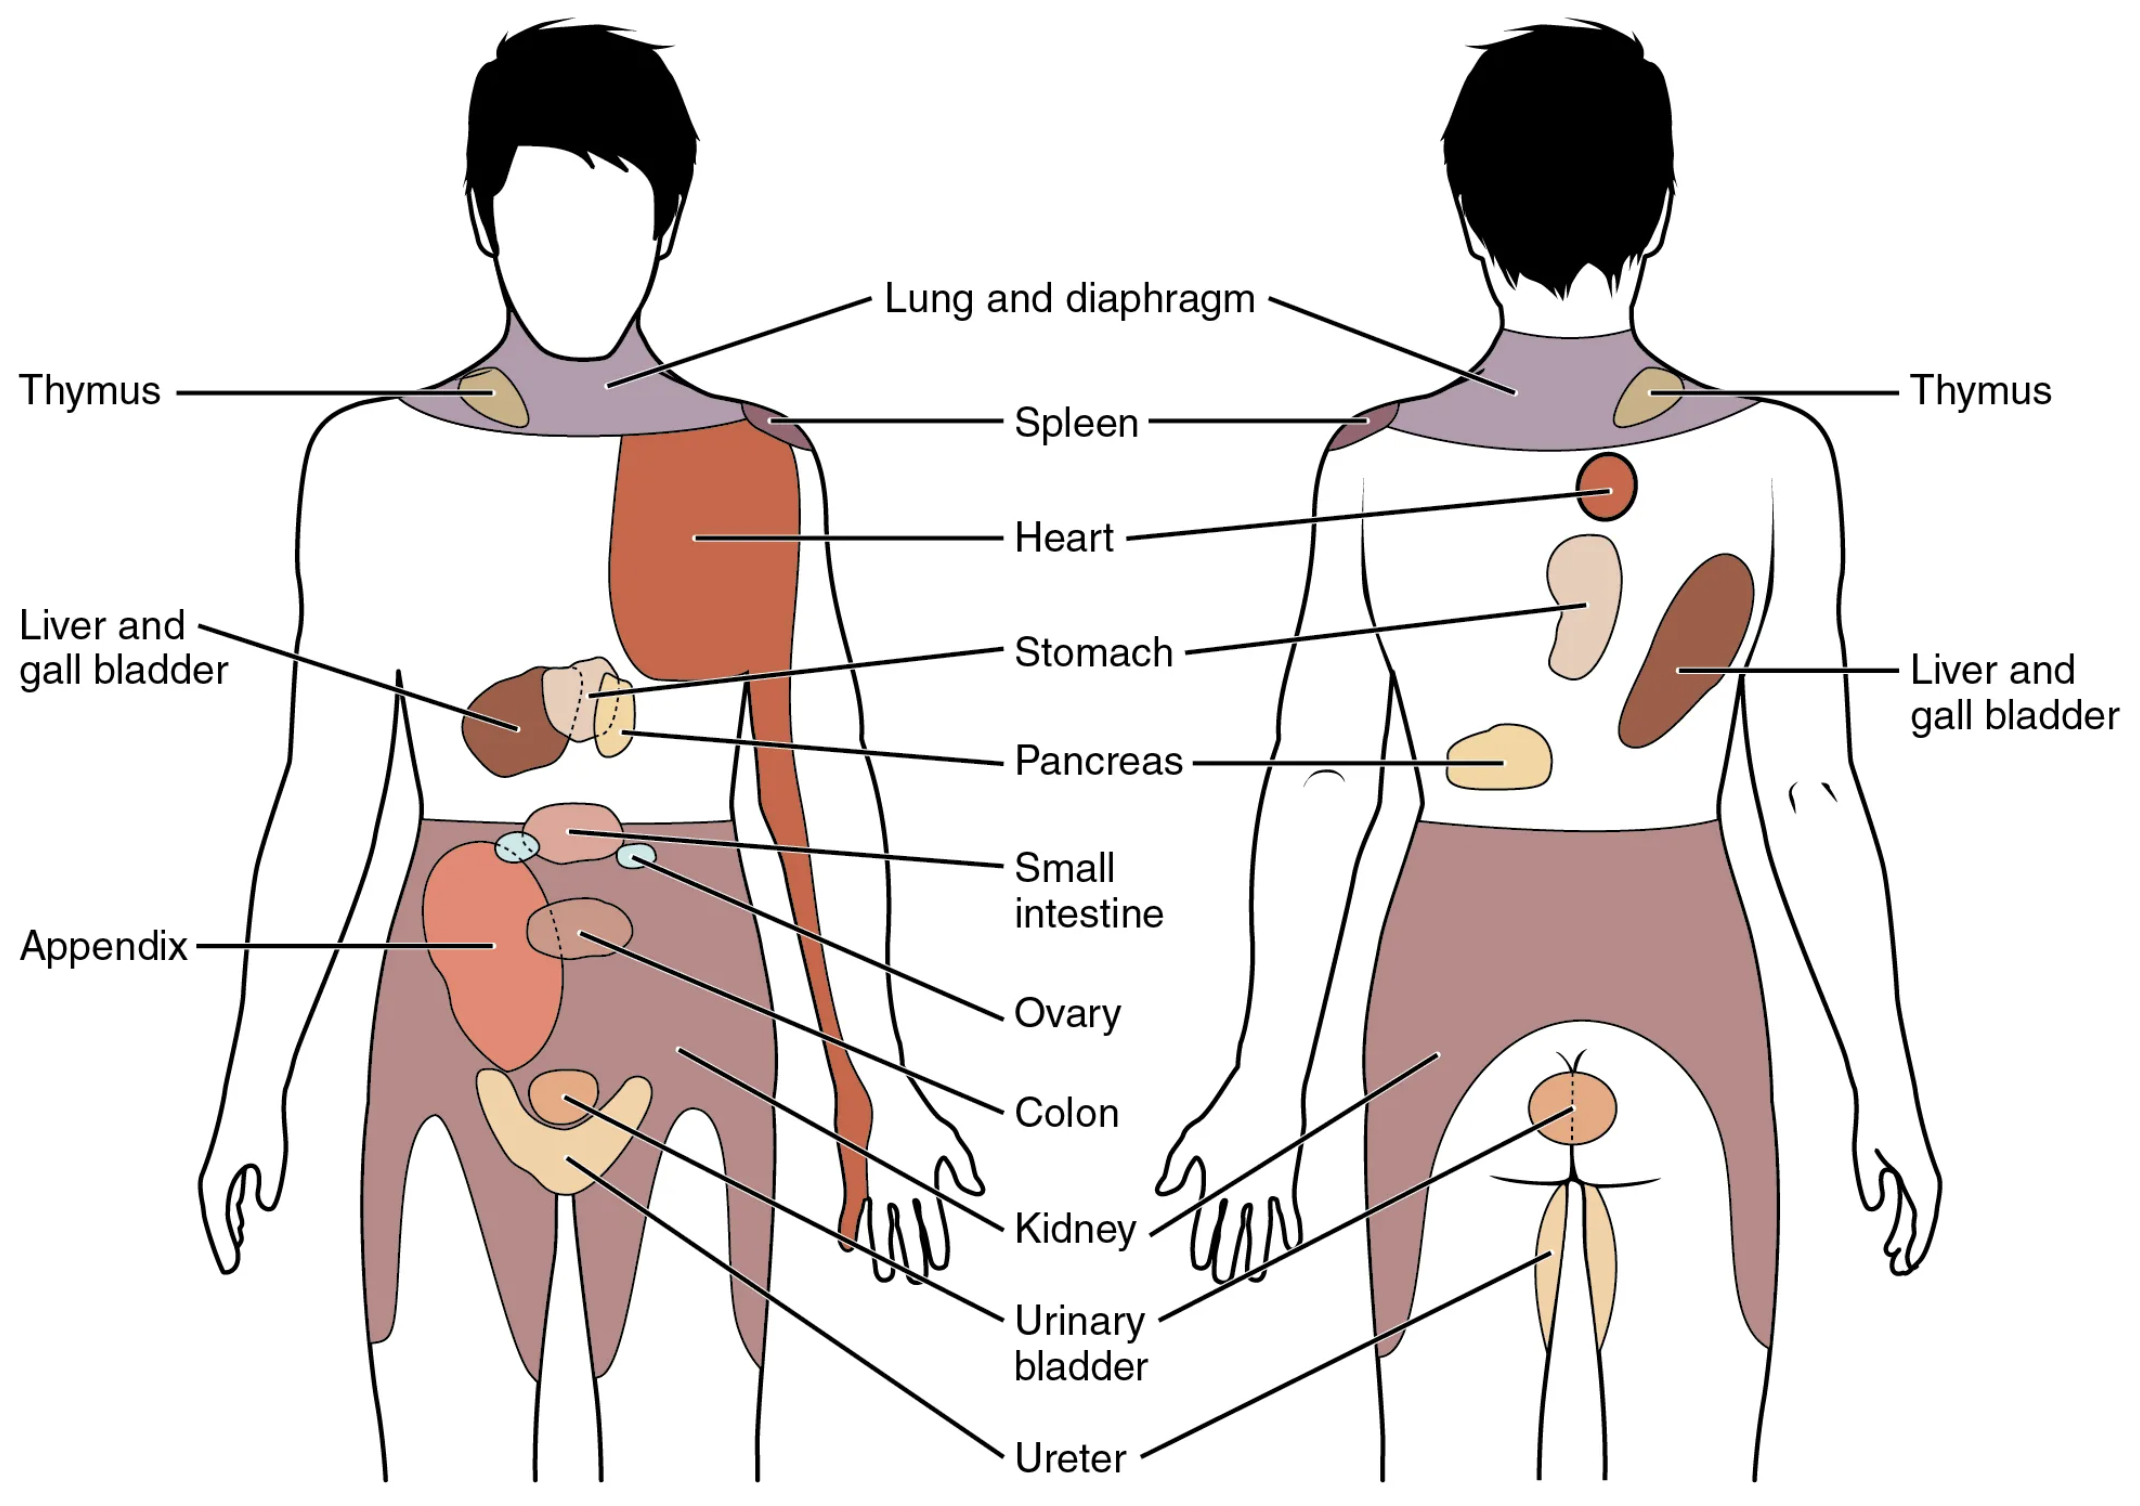
Referred pain
- Kidney
- Ureter
- Urinary Bladder
Gait
Patients who display a limp are 7x more likely to have a hip or hip and spine disorder compared to an isolated spine issue5.
Subjective
Before you throw the patient on the table and go to town poking and prodding, take a moment to gather a complete subjective.
Take a moment to listen to:
The patient’s story
Their description of the
List the client’s activities and activities of daily living.
- Frequency
- Duration
- Intensity
Client’s will often exclude their favorite activities from their list of aggravating factors.
- Pain
- Nature
- Severity (NPRS)
- 24 hour pain pattern
- AM vs PM
- AM stiffness
- Onset
- Pelvic floor
- B&B
- Hx pregnancy or Birth
History
Assessment (b proj)
- Observation
- Symptoms
- Subjective
Observation
- Assessing a client prior to the formal session, is an opportunity to gather the most candid movement and posture analysis.
Symptoms
Symptoms generally dictate a client’s chief complaint. Symptoms should be used as cues to the condition and are important to address in the plan of care, but should not be used to guide the plan of care.
For example, a client could be experiencing trunk pain as the source of their symptoms, but the cause and primary dysfunction is actually the hip. In this scenario, hyperfixating on the trunk would be a disservice to this patient, and would require constant symptom management until the primary dysfunction is addressed.
ROM
| Movement | Range@aptaCurrentConceptsOrthopaedic2024 | End-Feel2 |
|---|---|---|
| Flexion | 120° | Tissue approximation/stretch |
| Extension | 20° | Tissue stretch |
| Abduction | 40° | Tissue stretch |
| Adduction | 25° | Tissue approximation/stretch |
| Internal Rotation | 35° | Tissue stretch |
| External Rotation | 45° | Tissue stretch |
Muscle Length Tests
| Test | Muscles tested |
|---|---|
| Thomas Test | Iliopsoas |
| Thomas Test (90° knee flexion) | Rectus femoris |
| Thomas Test (hip IR) | Sartorius |
| Thomas Test (Hip ER Bias) | TFL |
| Hip Adductor length test (neutral) | Adductors |
| Hip Adductor length test (90° hip flexion) | Adductors |
| Straight Leg Raise | Hamstrings |
| Ober’s Test | TFL/ITB |
Table assessment
The table assessment should be guided based on a combination of your observations and their subjective account.
Initial setup
- Patient position: Prone with hips supported and feet supported.
- Clinician: Generally to the side of the patient
- Bend the knee so that you can use the distal lower leg as a lever to assess hip rotation
Palpation
To assess the hip here is how i usually start:
- Begin at the gluteal insertions around the rim of the ischium and iliac crests.
- move towards the center of the glutes and assess tone
- Move to the greater trochanter and assess hip IR
- assess the tendinous insertions of the Hip’s deep stabilizer muscles
- Assess/treat the muscle bellies of the deep stabilizers.
Adductor palpation
In prone you can palpate Pectineus, Adductor longus, Adductor brevis, and Adductor magnus.
Sidelying palpation
- IT Band
- TFL
- Glute max
- Its transition in the IT Band
- Glute med and glute min
- Assess the lateral roll and inferomedial glide of the femoroacetabular joint.
- Press under the greater trochanter and into the femoral neck.
- Normal: Elastic feeling
- Abnormal: Premature and rigid end feel (no elastic bounce/give)
Rotation assessment
Hip rotation is a solid starting point for assessing the quality of the hip’s range of motion. This test can assess the quality of both internal rotation and extension.
Posterior hip muscle pathways
As you approach the hip in a practical/clinical sense, it will benefit you to group the muscles in terms of purpose rather than as individual muscles.
Setup:
- Use your treatment hand to palpate the posterior hip muscles.
- Bend the knee to 90° and keep the thigh supported against the treatment table.
- Your opposite hand is holding the individual’s distal lower leg.
- Using your opposite hand, rotate the hip from neutral (vertical lower leg) to internal rotation (away from midline)9.
Note:
- Hip end feel
- Muscle tension changes
A guarding end feel has no elasticity.
When a muscle is guarding, it will abruptly stop since it is protecting the body from a stretch. Muscle guard release begins at neutral. As the muscle release progresses, slowly progress the range of internal rotation.
Iliotibial tract and hip ROM in sidelying
Lateral stability is crucial to weight bearing and linear movements. The TFL and Glute max co-activate and tense the IT band to affect lateral stability9.
Stabilization (b proj)
The ligaments of the femoracetabular joint include the iliofemoral, pubofemoral, and ischiofemoral ligaments. All of these ligaments are tensioned in extension.
The posterior hip is supported by the deep stabilizers The anterior hip is supported by the long tendons of the hip flexors
Gait
- Is the patient using an AD?
- Is it in the correct hand?
- Is it fitted to the correct height?
- Hip
- Limp
- Trendelenberg / Compensated Trendelenberg
- Knee
- Ankle
- overpronation
- Footslap / Foot drop
The Forward Lunge with the lead leg on a box or chair is useful to measure knee flexion and hip flexion of the anterior leg and hip extension of the rear leg2
Single leg stance is another test to observe the patient’s ability to perform unilateral standing without momentum and dynamic components of gait2
Treatment Plan
Manual therapy
- Manual therapy should be prioritized around the primary dysfunction.
Strain-Counterstrain
Prone treatment Categories
- Gluteus maximus (Deep and superficial layers)
- Pelvitrochanteric muscles
- Gluteus medius and gluteus minimus
- Hamstrings, hip adductors, and IT band
Abduction
Abduction refers to when the leg pivots directly laterally relative to the pelvis10.
ROM of this movement will depend on pelvic positioning and torso control10. When measuring ROM, the limit of abduction is when the pelvis begins to move with the leg in question10.
When reaching the abduction ROM limit of one hip, it will typically be followed by activation of the contralateral hip10. The passive limit of the ipsilateral hip and contralateral activation of the other results in lateral tilting of the pelvis towards the ipsilateral side10.
Sidelying Activation
- Patient sidelying and facing slightly towards the floor to promote hip abduction/extension
- Body position is the key to isolating the hip and preventing/minimizing compensatory counter movements10.
- Hold end position for 5 seeconds.
- This prevents the compensations that occur by bouncing between eccentric and concentric phases10.
Adduction
Adduction of the hips refers to when the leg pivots medially relative to the pelvis10.
“Due to opposite leg contact, there is no true adduction range”10
Hip adduction is a relative movement, only occurring when moving from abduction to neutral10.
Exercises include:
Dysfunction & Compensation
- Primary dysfunction:
- The epicenter of the manual therapy battle
- This is the region will not respond to treatment without the necessary time and effort9.
- Secondary dysfunction:
- Regions of the body that are adjusted their role and function due to the primary dysfunction
- Over time, the secondary dysfunctions will occur until tertiary compensations appear9.
The trunk’s muscle tolerance is generally much lower than the leg’s muscle guarding9. As a result, the legs will tend to disengage and rely on trunk mobility to achieve a movement.
Foundational Exercises
- Seated wall Hip adduction contract relax
- Adductor stretch
- Abduction ROM (not true abduction)
- Dead bugs
- Hip flexor activation
Hip Adduction / Wall Assist / Hand Resist
“Using a wall to assist in performing hand resistant hip adduction is not a true adduction movement. The adduction is coming from flexion + abduction + rotation position into flexion/adduction/rotation AROM. The goal is to activate hip adduction to release muscle guarding into greater pROM hip abduction range”10.
Setup
The setup is similar to the wall sit foundational exercise but instead of a “V” position of the lower extremity, we employ the “butterfly” position10.
- Sit at the crease of the wall and the floor
- Roll your hips forward (Anterior pelvic tilt) in order to push your glutes as far into the crease as possible
- Activate your abdominals by drawing your naval towards the wall without losing your hip position
- Retract and depress your shoulders
- Look forward (chin tuck) and bring your head backwards (retract) to hold it against the wall
- Bend both knees and externally rotate the hips so that the plantar feet are in contact with eachother at midline.
- Note the starting position of each leg, if they are symmetrical and how much range they hips have in this position.
- Place both hands on the medial surface of each knee
- Apply pressure to create tension on the hip adductors and feel for feedback
Elasticity is a sign of healthy adductor and hips10. Pain and rigidity is a sign of dysfunction10.
MMT
Single Leg Stance
Gait
Screening
Lumbopelvic complex
- Lumbar AROM as both single and repeated movement5
Pain
Dutton divided the causes of hip pain into the following categories: p8492
- Articular cartilage
- Childhood disorders
- Infection
- Neurologic
- Referred
- Systemic
- Trauma
- Vascular
Special Tests
Flexion Abduction ER Test (FABER): Provocation of hip pain rules in Hip joint or SIJ dysfunction
-
- Provocation of anterior hip or groin pain rules in intra-articular conditions.
- Crepitus indicates abnormal intra-articular structures.
- Provocation of anterior hip or groin pain rules in intra-articular conditions.
Flexion-Adduction-Internal Rotation Test (FADIR): Provocation of Anterior hip pain or groin pain is indicative of FAI or Acetabular Labral injury
Log-Roll Test: Increased external rotation of the femur on the involved limb indicates laxity of anterior capsuloligamentous structures AB-HEER Test: Provocation of anterior hip or groin pain indicates anterior microinstability
**Prone Hip Instability Test: Provocation of anterior hip or groin pain indicates anterior microinstability*
Hyper Extension-External Rotation (HEER): Provocation of at point of palpation or Radiating pain is positive for Piriformis/ deep hip stabilizer muscle dysfunction and potential sciatic nerve entrapment
Adductor Isometric Squeeze Provocation Test
- Provocation of groin pain indicates adductor muscle involvement on symptomatic side.
- Provocation with hip in neutral (0°) is a contraindication for return-to-play
Gluteal De-Rotation Test: Provocation of Lateral Hip pain is a indicates GTPS secondary to gluteal tendinopathy
Active Sidelying Piriformis Test: Provocation of at point of palpation or Radiating pain is positive for Piriformis/ deep hip stabilizer muscle dysfunction and potential sciatic nerve entrapment
Seated Piriformis Stretch Provocation Test: Provocation of at point of palpation or Radiating pain is positive for Piriformis/ deep hip stabilizer muscle dysfunction and potential sciatic nerve entrapment
Resisted Straight Leg Raise (Stinchfield Test)7
Gear Stick Sign7
Provocative maneuvers
Muscle Length Tests
Hip Tightness
Functional Tests
- Squat Analysis
- Deep Squat Test
Femoroacetabular Impingement & Labral Pathology Tests
- Flexion-Adduction-Internal Rotation (FADDIR)7
- Scour Test (Labral Stress Test)7
- Internal Rotation Over Pressure (IROP)7
- Posterior Impingement Test
- Flexion-Abduction-External Rotation (FABER/Patrick Sign)
Pediatric Pathologies
Legg-Calve-Perthes Disease
Slipped Capital Femoris Epiphysis (SCFE)
Fracture Pathologies
Avulsion fracture
Femoral Neck Stress Fracture (FNFS)
p8622
Pathologies
Fractures
- Femur
- Pelvic
Systemic Inflammation
Infection
Femoral Neck Stress Fracture
Rheumatoid Arthritis
Ankylosing Spondylitis
Gout
Lumbar disc herniation
Hip osteoarthritis
Hip microinstability
Femoroacetabular Impingement Syndrome (FAIS)
Ischiofemoral Impingement
Greater Trochanteric Pain Syndrome
Piriformis Syndrome
Hip Dysplasia
Iliopsoas Complex Injuries
Adductor muscle strain
Hamstring muscle strain
Hip pointer p8622
Contusion p8622
Myositis ossificans p8622
Osteoid osteoma p8622
Iliotibial Band Syndrome p8622
Trochanteric Bursitis p8622
Avascular Necrosis of the Femoral Head p8622
Piriformis Syndrome p8622
Iliopsoas bursitis p8622
Meralgia Paresthetica p8622
Degenerative Arthritis p8622
Piriformis Tendinitis p8622
Femoroacetabular impingement
Pincer impingement
Occurs when there is excessive coverage of the femoral head by the acetabulum (CEA >44°2) resulting in premature contact between the femur and the acetabulum
CAM Impingement
alpha angle > 55°
Hip Dysplasia
Hip Dysplasia: ?var:ref-hip-dysplasia.definition5
While pincer impingement occurs from excessive coverage of the femoral head by the acetabulum (large CEA), hip dysplasia is the polar opposite and occurs from a lack of coverage of the femoral head (CEA < 20°2)
Presentation
Often patients compensate for insufficient passive stability by maintianing a position of anterior pelvic tilt to maximize femoral head coverage5.
- Look for associated Iliopsoas and rectus femoris muscle tightness5
Treatment
Hip dysplasia is an unstable hip with overly-lax or weakened capsuloligamentous structures5.
As a result, treatment should involve a similar approach to hip instability.
- Protect structures from instability events
- Address impairments
- Optimize function
- Prevention of OA
Microinstability
Hip Osteoarthritis (Hip OA)
Hip Osteoarthritis: Progressive degeneration of the femoroacetabular joint
OA Etiology
Excessive loads on the hip
- Sports
- Heavy labor
- High BMI
Risk factors
- FAI
- Dysplasia
- PMHx joint injuries
The more risk factors a patient has, the less impact the joint will need to rule in OA
Presentation
- Pain in Groin and Lateral hip
- Gradual Onset
- Progressively worsening pattern
- >50years old
- ↓ Joint ROM (specifically IR)
- AM Stiffness: <1 hour after immobile periods
- Strength: ↓ LE strength
Special Tests
- (+) FABER
- (+) Scour Quadrant Test
- Relief with Long-axis distraction
Old OA Cluster
- Moderate anterior or lateral hip pain with weight bearing activities
- Morning stiffness >1 hour
- Hip ROM deficits:
- Hip internal rotation ROM <15°
- Hip internal rotation and flexion <15° compared to contralateral hip
- Increased pain with passive hip IR
Updated OA Cluster
- Moderate anterior or lateral hip pain with weight bearing activities
- Morning stiffness >1 hour
- Hip ROM deficits:
- Hip internal rotation ROM <24°
- Hip internal rotation and flexion <15° compared to contralateral hip
- Increased pain with passive hip IR
Treatment approach
Minimize joint irritation and inflammation
Short term
- Modalities
- Distraction
- Activity modification
- Gentle OKC strengthening
Long term
- Closed Kinetic Chain
- Improve hip stabilization
- Improve hip load absorption
Treatment Dosage
| Type | Days | Sets | Reps |
| Resistance | 2-3 | 3-4 | 8-12x |
| Stretching | 2-3 | 2-4 | 10-30s |
| Aerobic | 3-5 | 20-90min | 55-90% HRmax |
Refer to Aquatic Therapy
- Decreases impact of high BMI
- Minimizes joint loads
- Introduction to swimming as exercise
Femoral Acetabular Impingement Syndrome (FAIS)
Femoral Acetabular Impingement Syndrome (FAIS): Clinical presentation of hip pain caused by premature contact between femur and acetabulum bones.
Presentation
- Pain in C-Sign distribution
- Impingement positions: Repetitive/prolonged hip flexion + adduction + IR
- (+) FADIR
- Younger population
- Functional impairments
Single Leg Squat
- Decreased depth
- Loss of contralateral pelvic height
- Genu valgum/varus
- Trunk compensations
- Poor lower extremity control
Star Excursion Balance Test
Limited in Posterolateral and Posteromedial directions
I often use this test since it can be used as a treatment and easily added to the HEP
Treatment
There is limited literature for FAIS treatment
Sharing clinical expertise is even more valuable when managing this population!
Hip Flexor Mobility: Addressing hip flexor muscle length issues should be prioritized as tightness of these structures can have a postural effect by increasing anterior pelvic tilt.
Functional training: Progressing patients towards single-leg closed chain positions and movements
Hip Microinstability
Hip Microinstability: The combined entity of capsuloligamentous laxity and clinical symptoms (i.e. pain) with or without apprehension.
Etiology
In general there is no single traumatic event that causes hip microinstability. Bony dysplasia may be present but is not considered a necessary criterion.
The mechanism is repetitive microtrauma generally due to insufficient passive stabilization from the anterior joint capsule and iliofemoral ligament
Presentation
No hx of trauma
Aggravation with Weight bearing ER + extension (anterior instability)
Pain:
- Groin or Deep joint pain
- C-Sign Hip Pain Distribution
Functional difficulties
- Particularly in hip extension + ER
Weak hip abductor and rotator muscles
Diagnosis
- 3 Test cluster:
- AB-HEER test
- Prone instability test
- Hyperextension-external rotation (HEER) test
- 3 positive tests was associated with a 95% chance of microinstability.
DDX
Differentiate between local anterior microinstability and Global laxity
Anterior microinstability (local)
- Log Roll Test
- AB-HEER Test
- Prone Hip Instability test
- HEER Test
Global Laxity
- Beighton Scale
Beighton Scale
| Criteria | Left | Right |
|---|---|---|
| 5th finger metacarpophalangeal joint extension >90° | 0 or 1 | 0 or 1 |
| Ability to place thumb to forearm | 0 or 1 | 0 or 1 |
| >10° knee hyperextension | 0 or 1 | 0 or 1 |
| >10° elbow hyperextension | 0 or 1 | 0 or 1 |
| Ability to touch palms to floor with knees straight | 0 or 1 |
Total: /9
≥4pts → Presence of joint laxity
Adductor Muscle Injuries
Adductor muscle strains are a common injury in sports like hockey and soccer
with the MOI including acute, overuse, and acute-on-chronic
Acute Population
In kicking athletes, such as soccer, the injury is generally acute and occurs when rapidly transitioning between hip extension → flexion.
Overuse Population
Ice hockey consists of repetitive eccentric loading of the adductors and injuries are generally due to overuse
These injuries generally occur due to hip muscle weakness and lack of off-season conditioning. When ruling in an adductor strain, look for recent increases in activity
Most common adductors injured
- Adductor Longus
- Adductor Magnus
- Gracilis
Risk Factors
- Previous groin injury (2x risk)
- Lack of off-season sport-specific training
- Hip muscle weakness
- Adductor to abductor muscle strength ratio <80%
- Lower abdominal muscle weakness
- Decreased hip joint ROM
Prevention
Adductor:Abductor Strength ratio: >80%5
Pro hockey had 17x increase risk of adductor mm injury if <80%
The Copenhagen 5-second adductor squeeze test5
| Pain | Sport Readiness |
|---|---|
| 0–2 | Ready |
| 3–5 | Caution |
| 6–10 | Not Ready |
Framework for Muscle Injury Rehab
- ROM: Limited → Full ROM
- Strengthening: Isometric → Concentric → Eccentric
- Improve stabilization at nearby regions
- Maintain strength in unaffected hip musculature
Hamstring Injuries
Presentation
- Common injury in athletes
- Myotendinous junction of Biceps Femoris Long Head
- Pain and tightness in posterior thigh
Rule out Tendon avulsion
- Proximal posterior thigh pain
- Traumatic onset
- Inability or unwillingness to bear weight
- Visible ecchymosis
- Palpable defects in the hamstring musculature
Exercises
Hip flexor and knee extensor strengthening at end range
Start with isometrics
Long bridge
Standing HS curl
C Drill
Nordic curl
Preventing Secondary Complications
- Active SLUMP
H-Test
Using the H-Test is useful to determine apprehension when determining RTS after hamstring injury. The lower the apprehension, the more confident you can be in returning a patient to sport.
Greater Trochanteric Pain Syndrome (GTPS)
Definition
Greater Trochanteric Pain Syndrome: lateral hip pain that may originate from numerous sources surrounding the greater trochanter5.
- Gluteus minimus and medius tendons5
- Trochanteric bursa5
- Proximal ITB5
PathoMechanism
GTPS is theorized to be an overuse injury due to chronic movement dysfunction of Hip Adduction and IR due to poor eccentric control5.
An attempt to create stability by sitting into passive structures such as IT band and glute tendons
Population
Non athlete
- 40-60 years old
- Female
Athletic
- High impact
- Jumping on hard floor
Gluteal tendinopathy
- Gluteal De-Rotation Provocation Test
- Single Leg Stance Provacative Test: Provocation of lateral hip pain is positive for GTPS secondary to gluteal tendinopathy
Piriformis Syndrome
Piriformis Syndrome: Posterior hip pain that is present with radiating pain related to piriformis activation
Four clinical signs and symptoms
- Buttock pain
- Pain with sitting
- Tenderness near greater sciatic notch
- Pain with maneuvers that cause tension of the piriformis
Special Tests
Exercises
Hip flexor
- Thomas hip flexion exercise
Hip Abduction
Hip abduction + EXT
Hip abduction + High knee
Adding a high knee component allows the linear movement to explore the full range, while holding the leg laterally against gravity10.